Build your own lap frame.
A store-bought 14" gripper frame runs $80–150. The same frame, built at home from pine 1x2s and a strip of carpet tack, costs about $25 and two hours of Saturday afternoon. Here's the standard build — sized for the four course projects, expandable to any dimension you need.

Why this frame
Of the DIY frame designs out there — canvas stretcher bars, PVC pipe rigs, expensive slot-together kits — the pine-and-tack-strip gripper frame is the best value for a punch needle beginner. It's rigid, it holds monks cloth truly drum-tight, it lasts decades, and you can rebuild it in a larger size when you outgrow it.
The design below produces a 14" inner working area. That's big enough for Projects 01 and 02 (the coaster and the wall hanging), and enough for the sculpted piece in Project 04 with a bit of repositioning. For the 18"×24" floor rug in Project 03, either build a second larger frame or plan to reposition. Instructions for scaling both dimensions are at the bottom.
Materials list
Wood
- 4 pieces of pine 1×2 lumber, each cut to 16" — a "1×2" is nominally 1"×2" but actually measures ¾"×1½". Standard pine, no need for hardwood. A single 8-foot 1×2 from any hardware store gives you all four pieces with an inch to spare. About $4–6.
- Optional: 4 corner brackets (small L-brackets) if you'd rather screw at the joints than drill pilot holes.
Gripper
- Carpet tack strip — a wood strip about 1" wide with sharp angled nails poking out one side. Sold in 4-foot lengths at flooring stores and hardware stores. You need about 5 feet of strip for a 14" frame, so buy two 4' pieces or one 8' piece and cut. About $8–12.
- Alternative: rug-hooking gripper strip (rubber-backed with sharper, denser teeth) — sold online by punch needle suppliers. More expensive but easier on hands. A 40" length is enough for a 14" frame.
Fasteners & hardware
- 16 wood screws, #6 × 1½" (four per corner, or two if using brackets)
- Wood glue (optional but recommended)
- Heavy-duty staples (¼" or 3/8") for attaching the tack strip
- Small finishing nails (only if your tack strip doesn't come pre-nailed)
- Fabric cover / edge band — a strip of scrap cotton or muslin about 3" wide and long enough to wrap around the outside perimeter of your frame plus 6", to sew or velcro into a sleeve that covers the sharp teeth. This is what you rest your forearms on while punching, and what protects you when the frame is in storage. Optional: a store-bought "Oxford-style" fabric cover if you don't sew. ~$3 in scrap fabric.
Tools
- Handsaw, miter saw, or a hardware-store saw counter to cut the 1×2 to length
- Drill with a small pilot bit (1/16") and a #2 Phillips driver bit
- Heavy-duty staple gun
- Tape measure and pencil
- Sandpaper (120-grit) — five minutes' work to knock off splinters
Every hardware store carries pine 1×2 and carpet tack strip. Most flooring stores have off-cuts of tack strip for free or cheap if you ask. For the smoother rug-hooking gripper strip, order online from a punch needle supplier — Etsy, Loopy Wool Supply, or Amy Oxford's shop are all reliable.
Build steps

Note on the teeth: once the tack strips are on, those teeth stay sharp forever. Most makers sew a simple fabric sleeve — a band of cotton or muslin that wraps around the outside of the whole frame — to cover the exposed teeth. It stays on while you work (your forearms rest on it) and while the frame is stored, and it lifts off in seconds when you need to mount new fabric.
- Cut the four wood pieces to 16" The outer frame will measure 16"×16"; the inner opening (working area) will be about 14"×14" after you subtract the width of two boards. If a hardware store makes cuts, have them cut four 16" pieces from a single 1×2×8ft board. Sand the cut ends smooth.
- Lay the pieces out in a square Two horizontal pieces on top and bottom, two vertical pieces on the left and right, forming a picture-frame shape. The vertical pieces sit between the horizontal pieces (butt joint), so the outer dimensions are 16" × 16" — a simple butt-joint layout with no mitering required.
- Drill pilot holes and glue the corners At each corner, drill two 1/16" pilot holes through the outside face of the horizontal piece into the end of the vertical piece. Apply a thin bead of wood glue to the joint, then drive two 1½" wood screws through each pilot hole. Repeat for all four corners. Wipe glue squeeze-out with a damp cloth. Let the glue set for at least 30 minutes before flexing the frame.
- Measure and cut the tack strip Measure the inside length of each side of the frame — about 14½" if you built it as above. Cut four pieces of carpet tack strip to that length using a hacksaw, a pair of tin snips, or a coarse hand saw. Wear gloves — the nails are sharp.
-
Mount the tack strip along the inside top edge of each side, teeth pointing OUT
This is the step everyone gets wrong on the first frame. Set each tack strip along the inside edge of a frame board, with the sharp nails angled outward (away from the center of the frame) and upward (angled slightly up and away from the wood). This orientation lets you press fabric onto the teeth and have them grip it — teeth pointed the other way just fold the fabric off.
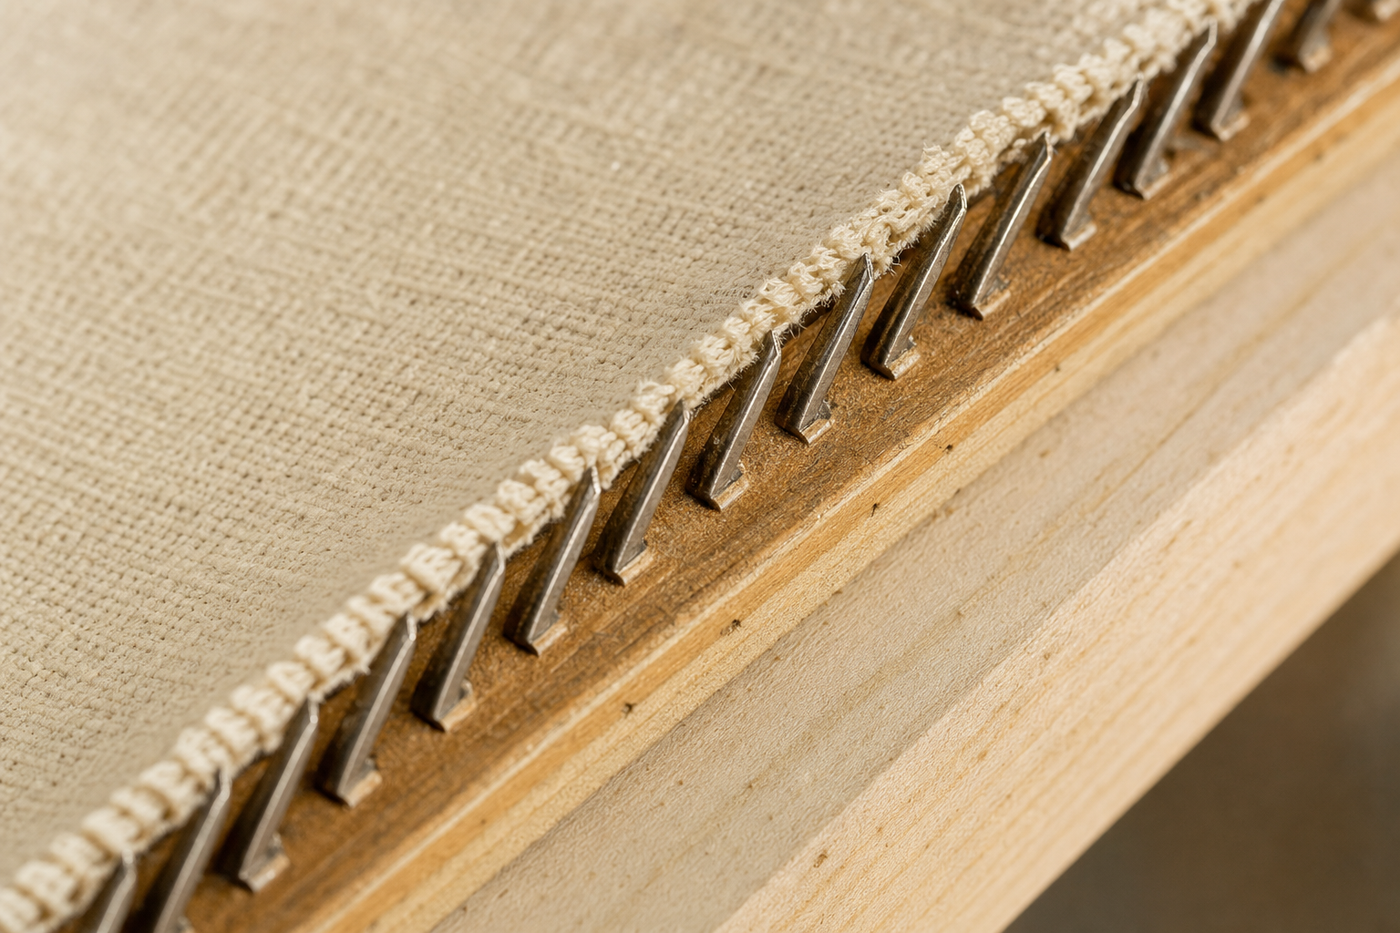
Teeth angled outward and upward. The monks cloth on the left is pressed onto the teeth and held drum-tight — no staples, no tape, no re-tensioning. - Fasten with staples every ½" Press the tack strip flush against the inside edge of the frame board. Staple through the strip's wood base into the frame every ½ inch along its length. If the tack strip has its own pre-driven nails, drive those in too. Repeat for all four sides. Corners: the tack strips don't need to touch at corners — a small gap of ¼–½" at each corner is fine and actually helps with fabric tension around the corners.
- Sew a fabric cover for the exposed teeth Once mounted, those teeth stick out permanently. Cut a strip of scrap cotton or muslin about 3" wide and long enough to wrap around the outside perimeter of your frame with a couple inches of overlap. Fold it lengthwise into a sleeve (roughly 1½" wide finished) and sew, or attach small velcro tabs at the overlap so it can be removed. Wrap it around the outer edge of the frame, covering the tack strips and their teeth. This is the surface your forearms rest on while punching, and it also keeps the frame safe to carry and store. The Amy Oxford company sells a ready-made cotton cover if you'd rather buy than sew.
- Test-mount a scrap of monks cloth Remove the foam caps. Center a piece of monks cloth over the frame. Press the fabric onto the teeth of one side. Move to the opposite side, pull the fabric taut, and press it onto those teeth. Repeat for the remaining two sides. If your teeth are angled correctly, the cloth grips instantly and pulls drum-tight. If it slides off, the teeth are angled the wrong way — you'll need to pull the strip off and re-mount it.

Two boards facing each other with sharp teeth angled outward will hold a piece of fabric tighter than any hoop, any staple frame, any weekend of arguing with a slack embroidery ring — and you built it yourself for the price of two thrift store coffee mugs.
Scaling the design
The 16"-outer / 14"-inner frame handles most beginner work. To scale up or down:
| Wood cut length | Outer frame | Inner working area | Notes |
|---|---|---|---|
| 10" | 10"×10" | ~8"×8" | Coaster-sized, portable. Fits Project 01. |
| 16" | 16"×16" | ~14"×14" | The standard build above. Covers Projects 01, 02, and 04. |
| 22" | 22"×22" | ~20"×20" | Big enough for most wall hangings and small rugs. |
| 18"×24" | 18"×24" | ~16"×22" | Non-square — cut two pairs at different lengths. Right size for Project 03. |
For rectangular frames
Cut two long pieces and two short pieces. The short pieces sit between the long ones. Follow the same corner joinery. Two 4-foot tack strips are enough for anything up to about 24"×24".
For larger than 22"
Pine 1×2 starts to flex on frames wider than about 24". Upgrade to 1×3 or 1×4 lumber for the long sides. The joinery stays the same; you'll just want longer screws (2" for 1×3, 2½" for 1×4).
Extras (once the base frame works)
- Rubberize the underside. Glue felt or shelf liner to the bottom of the frame so it doesn't slide around your lap or table.
- Add a lap board. Screw a small ½"-thick plywood or MDF panel to the underside for a solid work surface. Some makers cut a shallow trench in the lap board to catch dropped needles and yarn snips.
- Angle the front edge. If you find yourself hunching over the frame, cut the two front legs ½" shorter than the two back legs. The resulting slight tilt brings the work closer to your eyes.
- Sand and finish. A quick pass of 120-grit sandpaper and a rub of beeswax or clear polyurethane makes the frame nicer to hold. Optional but pleasant.
Everything about this build is forgiving except the angle of the tack strip teeth. Teeth outward and slightly upward — that's what makes the fabric grip. Mount the strip wrong and the frame will feel like it hates you. Mount it right and it will feel obvious in ten seconds. If your test-mount fails, pull the strip off before wasting time trying to work around it.